Wednesday, December 14, 2011

Hot Chocolate for Two

Here is a recipe entirely borrowed from the side of the Hershey’s Cocoa container. Never underestimate the recipes given on the side of the package…they’re probably there because they have enough credibility to be printed on there, haha!

So they also have their nutrition info provided (per serving) although I’m not sure what type of milk they used:

Calories: 180, Total Fat: 4g, Saturated Fat: 2.5g, Cholesterol: 15 mg, Sodium: 100mg,
Total Carbohydrate: 32g, Dietary Fiber: 2g, Sugars: 29g, Protein: 7g, Vitamin A: 8%,
Vitamin C: 0%, Calcium: 25%, Iron: 0%

Definitely not the healthiest, but sometimes on those colder days it’s the best way to wind down and okay to Treat Yo Self.  ;)


It’s going to take you just a few minutes to throw this hot cocoa together: slightly longer than “pouched” HC, but worth the few extra steps. I suggest even getting a few small zip-lock bags to prep your own “pouches” of the dry ingredients for later use!

What you’ll need:
-1/4 cup sugar (I use white, but I’m sure it would be fun to try brown)
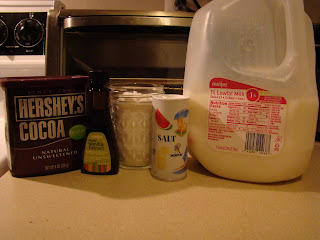
-2 tablespoons Hershey’s Cocoa (natural, unsweetened) – you can also use Dark if that’s your style! You may want to add another tablespoon if this doesn’t taste rich enough for you
-Dash of salt (pretty much, just do two or three quick shakes of your salt shaker. That’s a dash)
-1/4 cup hot water (I just turn my faucet on hot and wait for it to be its warmest)
-2 cups milk (any kind, I use 1%)
-1/2 teaspoon vanilla extract


Directions
1.      1. Mix sugar, cocoa, and salt in a saucepan, stir in water.
2.      2. Cook and stir over medium heat until mixture boils; boil and stir for 2 minutes.

3.      3. Stir in milk and heat; DO NOT BOIL.


4.      4. Remove from heat, add vanilla and stir.
5.      5. Serve with whatever toppings or flavors you desire!


And that’s it. J 
Some topping suggestions to spice up your cocoa:
-sprinkle of cinnamon and/or nutmeg
-cinnamon stick
-wafer sticks
-whipped cream
-stick a candy cane in there for the peppermint flavor
-chocolate shavings
-caramel syrup
-mini marshmallows
-get creative! – what toppings do you like to add to your cocoa?
This is what our final product looked like, with my choice of additional goodness:


Saturday, December 10, 2011

Holiday Pretzel Treats!

[click images to enlarge]


Alright, for my first post I will show you something ridiculously easy to make. This idea was actually posted on facebook by my friend's mom! So here it is! It is a nice holiday treat at home or as a little gift during Christmas. [You may also make this any time of year, but the colors used here are fitting for Christmas.]

-Takes about 5 minutes to prepare, 5 minutes to cook, and about 20 minutes in the freezer.
-Makes many servings, depends on how much money you feel like spending on chocolates, haha :)


What you will need:
-small, waffle-shaped pretzels (I bought Snyders on sale at Meijer for $2/bag)
-Hershey's kisses (I chose a bag of milk chocolate and a bag of the "candy cane"/mint because it looks good)
-Christmas M&Ms, the entire bag is red and green
-parchment paper
-cookie sheet

--total spent: I will keep better track of cost for the items in future entries, I think it'll be helpful. But this cost around $14, including the bags and tags (I talk about this below). Definitely a great price for how many pieces you get. [This total is assuming you already have some parchment paper and cookie sheet. I love parchment paper because you can reuse it as long as what you're making doesn't create a liquid mess. So if you need to buy parchment paper, know that this will not be something you must frequently purchase and can be used for many baked-goods projects.]

(top left: chocolate kisses, middle: pretzels, top right: candy-cane kisses, bottom center: red and green M&Ms)

1. First, preheat your oven to 170 degrees F (or 75 degrees C).
2. Next, line your cookie/baking sheet with your parchment paper.
3. Line up your pretzels on the sheet.
4. Place an unwrapped Kiss on top of each pretzel and place in the oven for 5 minutes.
(this picture borrowed from "Little Birdie Secrets" blog)

5.  The Kisses will start to look "shiny", but shouldn't really lose their shape too much. Remove from oven.
6. Gently top each Kiss with an M&M, with the "m" side down. It should immediately push the Kiss' point down, but if you have to press it into the Kiss, you may need to heat them a little longer.
7. Place in the freezer until the Kiss is cooled/hard again (I transferred mine to a small plate to fit in my freezer since it's smaller in size). 

Here's what the final product looked like once cooled and thrown into a pile, haha:
(my milk chocolate kisses could have baked slightly longer)

Notes:
      -I made my pretzels with both milk chocolate and candy-cane kisses for variety. If you are doing this as well, I recommend baking these in separate batches because they melt differently. The candy-cane kisses were ready to be taken out of the oven sooner than the chocolate, so make sure you keep an eye on them!
      -You can create a cute little goodie-bag to give these as a treat to friends and family. I went to my local Dollar Tree and picked up 3 packages (8 bags in each) of treat bags and a package of gift tags (50 count). (Cheap!)


Here is what a bag with some pretzels and a tag around it looks like: 

It also looks nice to use a clear bag because the treats themselves have a cool look to them. This bag only has about 16 pieces in it, I think it would look good with about 30.


And there we have it! 
After tasting these little treats, I thought they were really good. I like the salty-sweet combo of candied pretzels...a taste many are familiar with. So you'll have an idea if you'll like this before you even make it, most likely. It's just cool that it's home made, Christmas themed, and SO SIMPLE and quick. Definitely recommend this.

----------------
Let me know if you have any suggestions/edits, if you try out the recipe yourself, and what you like/dislike about it!
Thanks for reading! :D Happy snacking!

Welcome!

Hello there, my readers.

My name is Lesley. I am a 26 year old full-time graduate student and employee working in medical research. I am married to my best friend and have the coolest kitty and rat in the world. I enjoy many things, but to note: cooking, baking, knitting, photography, playing sports, playing board games, and bonfires!

God provides us with such great food and the taste buds to enjoy it...so I'm all about learning how to take advantage of such an opportunity. That being said, I have decided to make this a food blog, designed for logging recipes of meals and dessert I make! I am new(er) to this, but I am a biochemist so I see this battle field (the kitchen) as an extension of what I already do--mix chemicals and follow protocols/recipes! I've never really been inspired to write on the internet before (except for complaining, and there is enough of that, so I'll pass), so this is exciting for me. I really enjoy trying  to cook different things. We have to eat every day, so there will be plenty of material to write about. I have been trying to make new dishes once a week, and this blog will inspire me to continue that trend.

I have started building my recipe book for quite a few months now, so some things I post will be things I've done before, but when I am beyond those things it'll be all new! Therefore, it's definitely a learning process for me AND those reading. :-P I will try to give descriptions, post pictures, and my thoughts on the recipes and the outcome. Hopefully this helps others out there wanting to try new and easy meals. I am in no way a great cook or baker; I just follow recipes. So if I can do it, you can, too!

I will focus on:
1. "meals-for-two": since I am typically cooking for just my husband and me, but of course you can always expand the recipe to fit your need
2. from scratch, as much as possible (but sometimes you just need a really quick throw-together and those are good on occasion, too!)
3. healthy. for example, trying to use more natural ingredients while still being practical with what's available. please also note not ALL things are going to be super healthy (especially desserts haha) but I say "all things in appropriate moderation". I am also not a nutrition expert so I'm sure there are a lot of tweaks to recipes to make them healthier. if that's the case and you know it, please feel free to comment to educate me! I will try your suggestions next time I make the dish when it's feasible. :)
4. cheaper options for tasty meals. I figure this shouldn't be too difficult because anything home made automatically tastes better than not. My husb and I are both students and don't make very much, so this is pretty much a must!

It's safe to say little-to-none of the recipes I post will be original, haha. But this will be a compilation of what I try to make and (hopefully) a review of it. It's important to me to add a little variety in our diet and remain healthy! So this can serve as a log of options on what works (and what doesn't) for my family and may perhaps provide some insight for yours. We always sit down and make a menu for the week before we go grocery shopping, so it's nice to have a big list of entrees to choose from so we don't get too bored, recycling the same things over and over.

I just want to give a quick "thank you" to my mom who raised me on amazingly delicious home made meals. Our family was blessed to have a mom who loved to take care of us all and raised us healthy, and inspires me to treat my family the same. She is a great cooker and baker, and you can bet several of the meals I post will be things she has taught me. I hope to have her guest on here at some point! Which brings me to my last point:

I would also like to have guest bloggers if anyone would like to help out OR if you have a suggestion for a dessert or entree I should try and make! :) So just comment me or email me: lesleycalo@gmail.com if you would like to.